Mold Making Mistakes and How to Avoid Them: A Practical Guide for Better Results
Mold making is a versatile and rewarding craft that spans across art, design, prototyping, light manufacturing, and even heavy industry—like automotive parts. I know that firsthand from watching model makers at work in a foundry where I spent a winter helping produce car components.
Whether you’re replicating a sculpture, fabricating a part, or casting a decorative object, the difference between a successful mold and a failed one often comes down to preparation and precision. Over the years, I’ve learned—often the hard way—that paying close attention to the small details at every stage dramatically improves results and reduces waste, especially when working with expensive mold-making products.

This guide brings together common mold making mistakes and how to prevent them, with tips drawn from real-life projects. Whether you’re a beginner or looking to refine your process, there’s something here for you.
1. Start with Smart Planning
One of the most overlooked stages in mold making is the initial planning phase. A clear, well-thought-out plan prevents costly mistakes down the line. Before even opening a container of silicone or mixing compounds, I always ask myself:
Do I understand every stage of this process?
I used to plan everything automatically in my head—from the moment I saw the item to be copied. But when you’re starting out, I strongly recommend writing your plan down and keeping it visible while you work. Even with gloved hands, a printed checklist or having the plan open on a screen helps enormously.
Key elements to plan include:
- The design and size of your mold box (make it adaptable for future projects)
- The orientation and placement of your model (avoid undercuts whenever possible)
- The material best suited to your end goal
- Environmental conditions (temperature, humidity, airflow)
- The tools needed for measuring, sealing, and mixing
Even investing just an hour in preparation can save days of frustration. Sketch the layout (even mentally), list out your steps, and gather your supplies ahead of time.
Also, do your research. Read guides, watch tutorials—but be cautious. I’ve seen plenty of YouTube videos that are incomplete or even misleading. There’s no one-size-fits-all in mold making—but good planning gives you the flexibility to adapt when needed.
2. Common Mold Making Mistakes (and How to Avoid Them)
Here’s a breakdown of the common mold making mistakes I’ve made—or watched others make—along with fixes that require minimal extra effort.
Mold Making Mistakes #1: Not Leveling the Model
If your model isn’t level, neither will your mold be. That can lead to distortions or uneven casting.
Fix:
Use a small spirit or bubble level to check the model’s position inside the mold box. Shim one side if needed. Starting with a level workbench helps eliminate these issues before they begin.
Mold Making Mistakes #2: Poorly Sealed Mold Boxes
If your mold box isn’t sealed properly, material leaks out, wasting product and making a mess of your workspace.
Fix:
Apply strong adhesive tape or silicone sealant to every seam and corner. I run a finger along each edge with a final bead of sealant—just to be sure. Also, account for the weight of the liquid. Unsupported boxes often bulge or collapse under pressure.
Mold Making Mistakes #3: Choosing the Wrong Mold Material
Material selection affects flexibility, detail reproduction, and overall mold durability.
Fix:
Do your homework. Flexible silicone is ideal for detail and easy removal, while rigid materials suit repeat-use molds. Always test with a small batch first. Suppliers often help with this—or refer to our post on Food Grade Silicone, here. later, there will be another post on product labels
Mold Making Mistakes #4: Poor Mixing
Incorrect ratios or sloppy mixing can cause sticky or uncured molds—or ones riddled with air bubbles.
Fix:
Follow the manufacturer’s instructions. Mix slowly and thoroughly, scraping the sides and bottom of the container. I usually mix a little extra to allow for overflow or top-up.
3. A Practical Checklist to Stay on Track and Avoid Mold Making Mistakes
Here’s my go-to checklist—print it out or save it to your phone or tablet:
- ✔ Model placement – Level and secure
- ✔ Box sealing – Tight corners and reinforced seams
- ✔ Material choice – Suited to project and pre-tested
- ✔ Environment – Temperature and airflow in range
- ✔ Mixing – Correct ratio and well-blended
- ✔ Ventilation – Especially when using fumes or resins
- ✔ Tool cleanliness – Before and after use
Once these habits are in place, your troubleshooting time drops—and success becomes consistent.
4. Pro Tips for Leveling Up Your Mold Making Mistakes
If you’ve nailed the basics, here are some ways to refine your technique even further and avoid the common mold making mistakes.
Invest in Good Tools to Avoid Mold Making Mistakes
Quality cups, spatulas, heat guns, clamps—these improve consistency. I also coat tools with release wax before use. It makes cleanup faster and extends tool life.
Control the Environment
Temperature-sensitive materials can fail if it’s too cold or humid. Most silicones cure best between 20–25°C (68–77°F). I use a digital thermometer to monitor workspace conditions.
Test Before You Commit
Trying a new product or technique? Run a small test mold first. You’ll catch issues early and protect your main project.
Document Everything
Keep track of product names, ratios, room conditions, and results. I take photos of every stage. Smartphone folders with auto-backup are a great way to stay organized if you’re juggling multiple jobs.
5. Real-Life Lessons: What Went Wrong (and How I Recovered)
Case 1: The Leaky Mold Making Mistakes
I once cast a small 7″ plaque. The mitred joints on the box looked tight, so I skipped sealing and didn’t check the level. Ten minutes in, a slow leak started—nearly ruining the mold and the table.
Lesson:
Never assume. Always double-seal corners. A quick plug with modeling clay and a top-up saved it, but I never made that mistake again.
As an Amazon Associate, I earn from qualifying purchases.
This post contains affiliate links. If you buy through them, I may earn a commission at no extra cost to you.
Case 2: Bad Mix = Bad Mold
Rushing through a batch of thick silicone, I didn’t scrape the sides or bottom of the container properly. Some parts cured, others stayed sticky for over 24 hours. The mold had to be scrapped.
Lesson:
Always mix thoroughly. And check expiration dates—old stock can behave unpredictably.
Where to Buy This Silicone
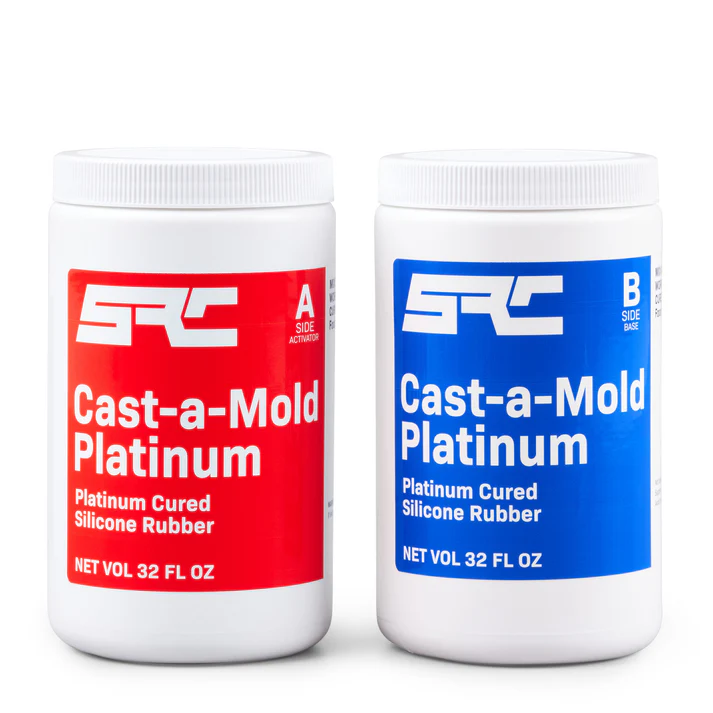
This 64oz Cast-a-Mold Platinum Silicone kit (2 × 32oz) is available from both Amazon and the official supplier, SRC (part of Polytek). Both are trusted sources, but there are a few important differences worth noting.
You can purchase it on Amazon for convenience, especially if you already shop there regularly or have Prime. Although this might be a drop shipping method used.
However, with specialty materials like this, Amazon orders are often fulfilled by third-party sellers—not from Amazon’s own warehouse—so delivery times and storage conditions can vary. This may not be ideal for shelf-sensitive products.
Alternatively, buying direct from SRC offers much better value—currently $64.07 after their 11% discount. If you’re ordering multiple items (like resins, pigments, or larger kits), you may also qualify for free shipping on orders over $200.
| Vendor | Link | Best For |
|---|---|---|
| Amazon | Buy on Amazon | Trusted, fast shipping, Prime users |
| SRC / Polytek | Buy Direct from SRC | Lower price, better packaging, bulk orders |
I’m affiliated with both sources—whichever you choose helps support this site. Thank you!
Author’s Note:
I’ve personally ordered full 55-gallon kits directly from Polytek via ground shipping and always received properly packed, fresh materials. When it comes to shelf-sensitive products like platinum-cure silicone, I trust direct shipping from SRC more than third-party fulfillment—especially for larger or time-sensitive projects.
SRC is part of the Polytek group, and I have worked with their products for years with great success.
6. FAQs for Mold Making Mistakes
Q: How can I tell if my mold has cured?
A: Press the surface lightly with a gloved finger. If it’s firm and leaves no print, it’s likely cured. Always follow the full recommended cure time.
Q: What causes air bubbles, and how do I avoid them?
A: Fast mixing or poring or trapped air around the model. Brush a thin layer of silicone on first or pour slowly. There are also bubble-free products worth testing if detail is critical.
Q: Can I reuse mold boxes?
A: Yes, if they’re made from durable materials like acrylic or fiberglass—and you’ve applied a release agent. Clean and reseal before each use.
Final Thoughts: Patience is the Hidden Ingredient
This article on Mold making mistakes blends technical accuracy with creative form. When done right, mold making is extremely rewarding. When rushed, it’s often frustrating and costly.
Respect the process. Start with small projects (it costs less for mold making mistakes). Take notes. Adjust as you go. Every mistake is a stepping stone—so long as you learn from it.
Stick with it, and over time, you’ll build confidence, refine your technique—and produce great results.
Contact Us
We hope you found this information on mold making mistakes helpful! If you have any questions or need assistance, feel free to reach out. Please note that due to government regulations, you’ll need to sign in and confirm your message. We apologize for any inconvenience.
Author: Rob
Ps. This is the company that taught me how to build this site and 3 others in 6 months, they keep their promises.


I can definitely relate to the trial-and-error aspect of mold making! When I first started experimenting with resin casting for some hobby projects, I thought it would be as simple as pouring liquid into a container. Boy, was I wrong!
Like the article mentions, my early attempts were plagued by many of the common mistakes. I definitely had my share of leaky mold boxes – I underestimated the pressure of the resin and didn’t seal the seams properly, resulting in a sticky mess all over my workbench. And the frustration of a poorly mixed batch that either wouldn’t cure or remained tacky for days is something I remember vividly. It’s so disheartening to waste expensive materials like that.
One lesson I learned the hard way, which the article touches on, is the importance of understanding your materials. I once tried to use a silicone mold that wasn’t rigid enough for a two-part epoxy resin, and the mold warped under the pressure, completely distorting the final cast. Now, I always do my research and sometimes even reach out to the supplier for advice on the best material for a specific project.
The checklist provided in the article is fantastic and something I wish I had when I was starting out. Even now, after a few years of experience, I still find it helpful to mentally (or sometimes physically) run through those points before starting a new mold. It really helps to minimize those silly, preventable errors.
The case studies in the article are also very relatable and offer valuable lessons. That quick fix with modeling clay for the leaky mold is a classic example of on-the-fly problem-solving that many of us have had to resort to!
Phil
Hi Phil,
I thank you for taking the time out of your day to comment and share your experiences, it does help others who may read them.
You seem to have been through most of the commonest mistakes that seem to happen.
Thanks, Rob