
 By Robby
Introduction to Silicone Mold Making: Can Beginners Really Do This?
Table of Contents
Introduction
Introduction to Silicone Mold Making: Can Beginners Really Do This?
When people first hear about silicone mold making, it can sound far more complicated than it really is. In practice, you don’t need a professional workshop or lots of specialist equipment to make your first silicone mold at home.
At its simplest, making a silicone mold involves five basic steps:
- Choose something you want to copy.
- Make and prepare a leak-proof mold box.
- Prepare and position your model, then apply the appropriate release agent.
- Mix and pour your silicone rubber.
- Allow the silicone to cure, then demold your original.
That’s silicone mold making in a nutshell.
Of course, there is a little more to getting each of those steps right, and that is where this guide comes in.
Silicone molds are used for everything from resin casting and decorative cast stone to candles, soap, food-safe molds and restoration work. They are popular because they can reproduce very fine detail while remaining flexible, durable and relatively easy to release from the finished casting.
I/We promote transparency. This post or site may contain affiliate links. This means only if you make a purchase through these links, not just by clicking, I/we may earn a small commission at no extra cost to you.
As an Amazon Associate, I earn from qualifying purchases
For a beginner, the important thing is choosing a sensible first project and understanding the process before you start. You should also understand the basic safety requirements for the materials you are using. So, before you begin, I recommend reading my basic workshop safety guide. You can open it here: [Basic Workshop Safety Guide].
The rest of this guide takes you through the process step by step, with the aim of making your first silicone mold project as straightforward and successful as possible.
I’ll also explain many of the small things I now do automatically after years of making molds. Most of those lessons came from mistakes I had to work out for myself, long before Google and YouTube made answers so easy to find.
My intention is not just to give you the basic steps, but to explain the little decisions along the way that can make the difference between a successful mold and one you have to start again, while saving you the time of searching elsewhere for the information you need.
So, can you make a silicone mold at home?
Yes, absolutely. With the right silicone, a suitable first project and a little preparation, it is very achievable.
Sorting Out Your Toolkit: What You’ll Need
Getting started with silicone mold making doesn’t require expensive or specialist tools, but there are a few essentials you shouldn’t cut corners on.
The most important material is the silicone itself. For beginners, a two-part silicone designed specifically for mold making is the safest choice. These are widely available online and through craft or specialist suppliers. They consist of a base and a curing agent that are mixed together in a set ratio. On another of our posts, How To Choose From Silicone Mold Making Kits. you can read far more on this topic
For this silicone, you have a choice of where to buy. The product originates from Polytek and is available through Specialty Resin & Chemical (SRC), or you can buy the same product through Amazon. Some people prefer buying directly from a specialist supplier such as SRC, while others are more comfortable using Amazon, particularly if they already have an account and trust its ordering and delivery system. I’ve provided both options below so you can simply choose whichever supplier you prefer.
I have used these types of products professionally for many years, so whichever supplier you choose, you can also check the technical data for the specific silicone before ordering.
Then:
When choosing silicone, beginners are best starting with a general-purpose, two-part silicone specifically sold for mold making. Platinum-cure (also known as addition-cure) silicones are widely used because they are stable, accurate, and easy to work with. They cure reliably when mixed correctly and are suitable for a wide range of small craft and decorative projects. Avoid construction sealants or general-purpose household silicones, as these are not really designed for mold making and often lead to poor results.
You’ll also need a mold box or container. This holds your original item and keeps the silicone contained while it cures. Many people use plastic food containers, purpose-made mold boxes, or simple DIY solutions. The main requirement is that it’s rigid, non-porous, and leak-proof.
Basic mixing equipment is essential:
- A straight-sided mixing container
- A stir stick or spatula
- Disposable gloves
- Safety glasses
Silicone mold making can be messy, so it’s best to use items that are easy to clean or disposable. Applying a light layer of wax to mixing containers and tools before you start makes cleanup far easier once the silicone has cured. Laying down thin plastic sheeting, such as a split-open bin liner, over your work surface is another simple way to protect your workspace.
A release agent isn’t always necessary, but it can be useful depending on what you’re molding. Some materials release easily on their own, while others benefit from a light barrier to prevent sticking.
Safety and Ventilation Considerations
In terms of safety, silicone mold making does not involve highly aggressive chemicals, but sensible precautions are still important. Disposable gloves help keep silicone off your skin, and eye protection reduces the risk of splashes during mixing and pouring and old clothing or an apron are worth considering.
Ventilation should always be considered. While many modern mold-making silicones have very low odour, some products can release fumes during mixing or curing. Working in a well-ventilated area is recommended. If you are working in a confined or poorly ventilated space, using a suitable respirator or mask designed for chemical vapours is good practice.
Costing
As for cost, silicone mold making doesn’t have to be expensive. Small starter kits are relatively affordable, especially if you begin with a simple, single-piece mold. The size and complexity of your project directly affect material costs, so starting small is always advisable. Many mistakes can easily be avoided with up-front knowledge, many of these can be found on our post about mold making mistakes.
Preparation matters more than people realise. Having everything laid out before you mix silicone avoids rushed decisions and mistakes once the clock starts.
Step-by-Step Guide to Making Your First Mold
The process itself is straightforward, but attention to detail makes a big difference to the final result.
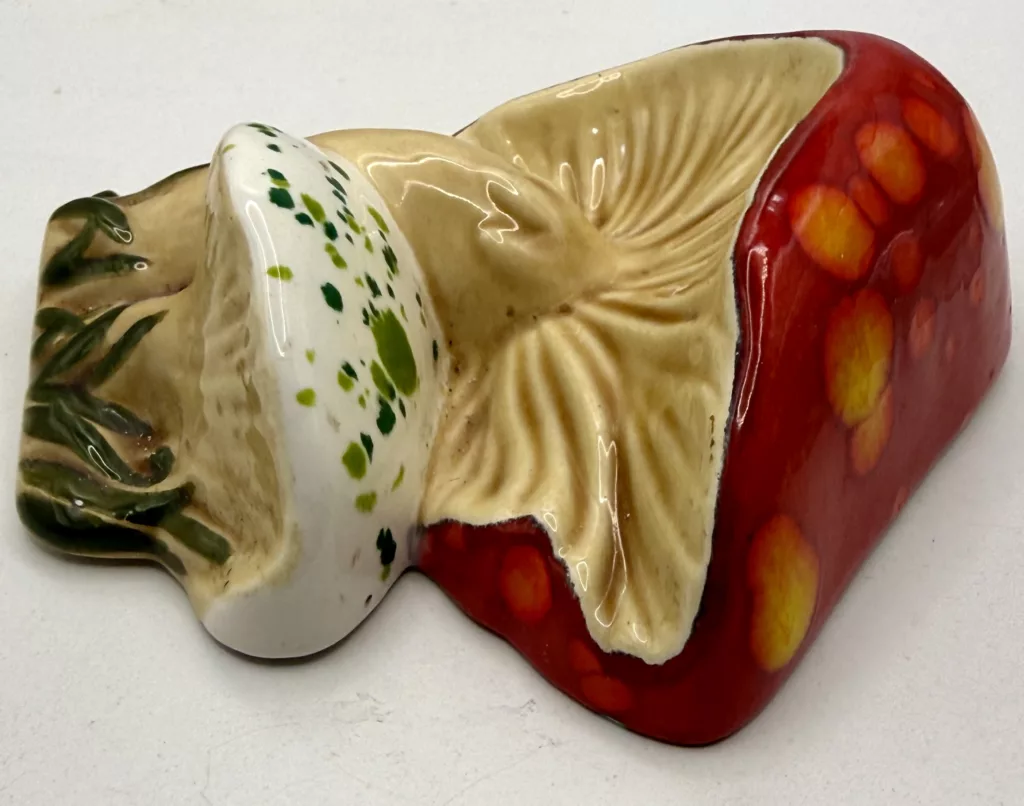
Start by preparing your model. It should be clean, dry, and free from loose debris. Simple glazed pottery items or small decorative objects make ideal first projects, as they release easily and don’t require complex mold construction.
Building a Simple Silicone Mold Box
This is the most important step in the entire mold-making process.
If the mold box is wrong, the silicone will leak, the model can move, and the finished mold will fail before it even cures. When that happens, nothing that follows can recover it. Getting this stage right makes the rest of the process far easier.
Choosing the correct type of silicone mold box
Before selecting materials or building anything, you must decide which type of mold box you are making. There are three distinct options, and they are not interchangeable.
1. Cure-only mold box (temporary or disposable)
This type of mold box is used only to contain the silicone during pouring and curing. Once the silicone has cured, the box is removed or dismantled and is no longer part of the mold.
This approach is suitable when:
- the silicone mold will be self-supporting
- the mold will not need external support during casting
- the box is only required to control the pour
This is the simplest option and is common for one-off molds and learning projects.
2. Permanent mold box, When the silicone is sometimes allowed to bond to the box
In this configuration, the mold box becomes a permanent part of the mold system. The silicone is sometimes intentionally allowed to bond to or mechanically lock into the box, depending on the needs of demolding.
This approach is suitable when:
- the mold needs long-term structural support
- the piece is relatively simple to demold
- consistent positioning and stability are required during repeated casting
Flat or low-relief pieces are typical examples. In these cases, demolding is straightforward and there is no advantage to removing the silicone from the box.
3. Permanent mold box, silicone must release from the box
This is also a long-term support box, but unlike the previous option, the silicone mold must be able to lift out and return to the box freely.
This approach is commonly used when:
- the model has undercuts or complex geometry
- the silicone mold may need to be cut to release the model
- the support box is required to maintain shape and alignment during casting
In these cases, the mold box provides external support and correct orientation, but it must never trap the silicone.
Once this choice is made, material selection and construction methods become clear.
Suitable materials for a cure-only mold box
The mold box does not need to be complex, but it must be sealed.
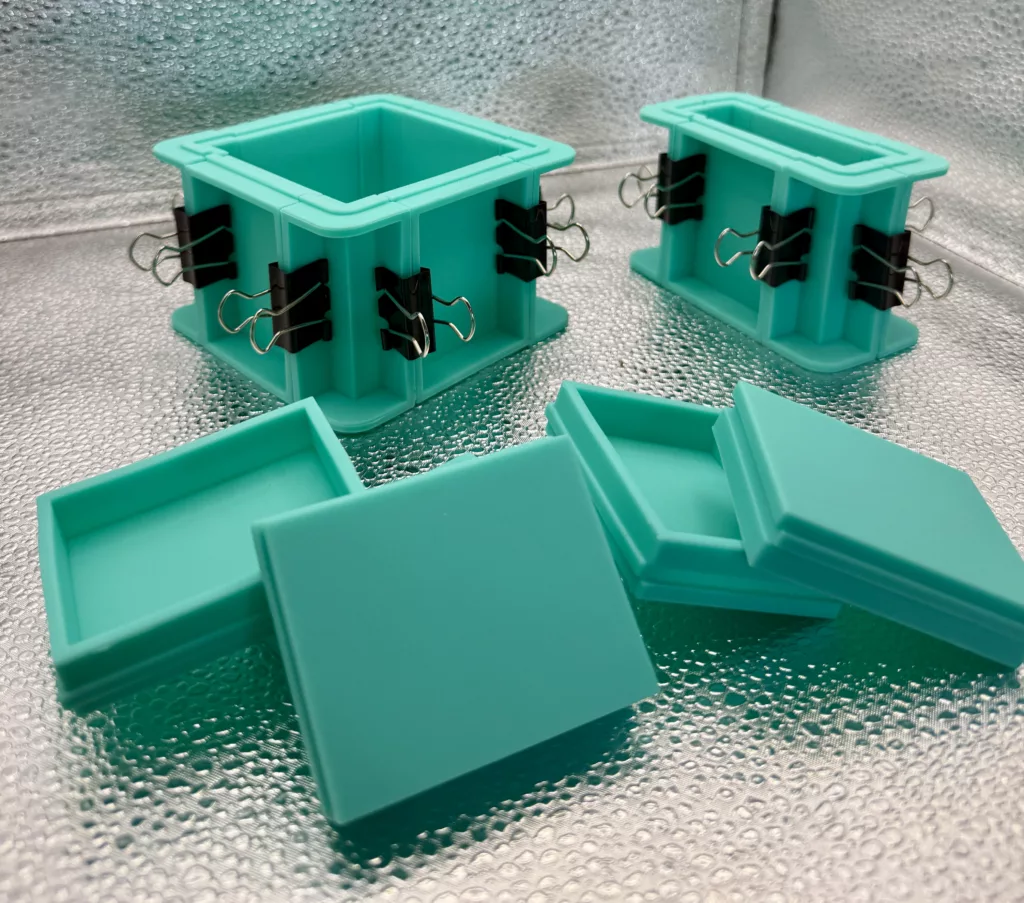
Common materials include:
- Foam board or foam core
- Purchased multi-section or adjustable mold boxes
- Plastic sheet or offcuts
- LEGO bricks
- Plastic containers
- Smooth plywood or other wood, provided at least one surface is sealed and all joints are properly closed
Any surface in contact with silicone should be smooth and non-porous. Silicone will bond aggressively to porous materials and can be extremely difficult to remove.
As an added precaution, applying a release agent to the mold box and base is recommended.
Suitable materials for a permanent mold box (silicone bonded)
Common materials include:
- Treated sawn timber
- Thicker grades of waterproof plywood
- Fiberglass
- Metal that has been properly coated for corrosion resistance
If any surfaces in contact with the silicone are smooth and non-porous, mechanical retention is required. This can be achieved by drilling holes or adding screws so the cured silicone is physically locked into the box.
Suitable materials for a permanent mold box (silicone must release)
Materials are similar to bonded boxes, with key differences in preparation:
- All surfaces in contact with the silicone must be non-porous
- No screws or mechanical fixings should penetrate into the silicone
- Release agent should be used consistently
If the mold box is larger than the silicone mold, locator features are recommended. Simple concave or convex locator lugs help ensure the silicone mold returns to the correct position after demolding.
What The Silicone Mold Box is For
The mold box holds the silicone in place while it cures and controls the final shape of the mold. It should sit on a flat, non-porous, level base so the cured silicone can be released cleanly.
For simple cure-only block molds, the box itself provides sufficient support during curing and no additional shell is required.
Size and Clearances For a Silicone Mold Box
The mold box must allow enough silicone thickness for strength and durability.
For small models, a simple box allowing 3/8–1/2 in (10–15 mm) of clearance on all sides and above the model is usually sufficient.
For larger models, loosely following the shape of the model while maintaining the same clearance provides two benefits:
- reduced silicone usage
- improved orientation when the mold is returned to its support box
As a minimum:
- Leave 3/8–1/2 in (10–15 mm) of clearance on all sides
- Leave the same clearance above the highest point
Using less than this often results in thin walls, tearing, or distortion during demolding.
Fixing the Model in Place
The model must be fixed to the base so it cannot move or float when silicone is poured.
Common methods include:
- a small amount of hot glue
- clay or plasticine
- double-sided tape for lightweight models
- selected caulks, excluding strong construction adhesives
Before pouring, confirm the model cannot shift under light pressure.
Preventing Leaks and Underflow
Silicone will flow through even very small gaps. It behaves much like water, but once cured it will lock itself into any space it has entered.
If seams are sealed from the outside only, silicone can still escape internally. This makes dismantling the mold box or demolding the silicone many times more difficult, and can render the mold unusable.
All sealing must be done from the inside of the mold box.
Before Pouring:
- Seal all seams and corners from the inside, including any unplanned holes, gaps, or fastener penetrations
- Press joints firmly together first, then apply the seal so it bridges the joint internally
- Pay particular attention to the joint between the mold box walls and the base
- Seal neatly around the model where it meets the base, as this internal fillet shape will be reproduced in the silicone mold
- Do not rely on external sealing alone
A water test can be used to confirm internal sealing, but the mold box, base, and model must then be allowed to dry completely before silicone is mixed or poured.
A Common Failure to Avoid
Do not rely on pressure alone to hold the mold box together.
Always use mechanical fixing such as screws or caulk.
If the box can flex or separate, it will leak.
Before mixing, make sure your work surface and mold base are level. This ensures the back of the finished mold cures flat, which makes later casting far easier. Clean out any dust and debris annd cover your silicone mold until you are ready to pour the silicone.
If you would like to see another example of this process before making your first mold, Polytek has a useful illustrated tutorial showing a simple one-piece silicone block mold from preparation through to demolding.
You can view it here: [Polytek: How to Make a One-Piece Silicone Block Mold].
Mixing and Pouring Your Silicone Mold.
Next comes mixing the silicone. Follow the manufacturer’s instructions carefully, especially the mix ratio as they do vary. Measure accurately and mix thoroughly, but don’t rush. Stirring too aggressively can introduce air bubbles. Make sure to scrape the sides and bottom of the mixing container so all material is properly mixed.
When pouring, take your time. Pour slowly from one point and allow the silicone to flow naturally around the model. This helps reduce the possibility of trapped air. Gently tapping the mold box as you pour and again when you are finished pouring, as it can encourage any bubbles to rise to the surface.
Once poured, leave the mold to cure fully. Cure times vary depending on the silicone used, so resist the temptation to demold early. Most problems occur when this stage is rushed. If possible, tent over your mold to stop dust partices landing on the back surface of your mold.
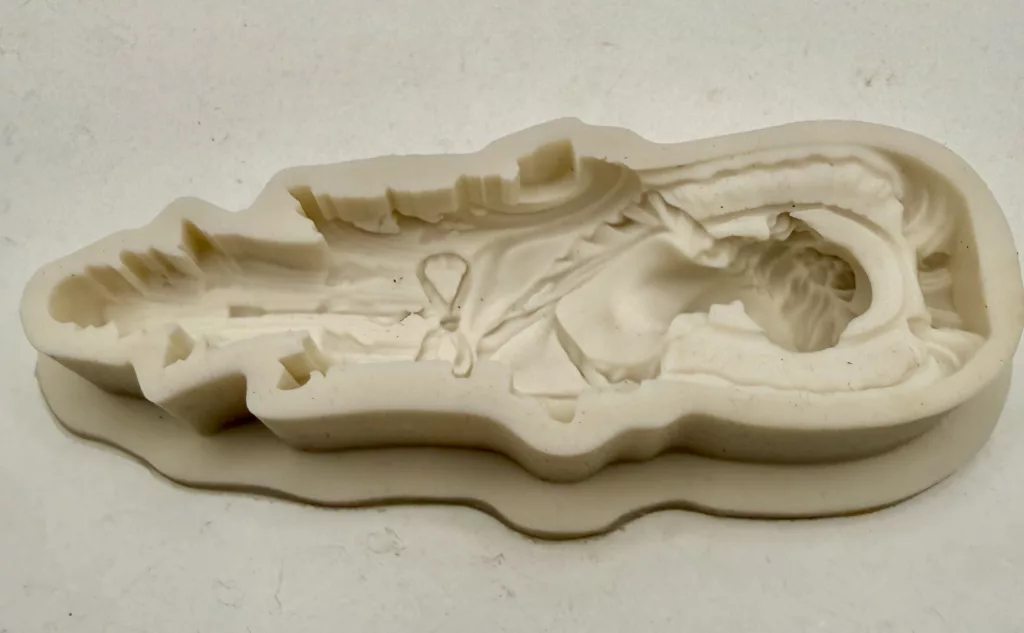
After curing, carefully remove the mold from the box and separate it from the original item. This is often the most satisfying part of the process and a good indicator of how well the preparation and pouring went.
Mistakes do happen. Air bubbles, thin spots, or incomplete coverage are all part of learning. Each attempt improves your understanding and results.
Setting Realistic Expectations: Challenges and Progress
Silicone mold making has a learning curve, and it’s important to be honest about that. Your first mold doesn’t need to be perfect to be successful.
Common beginner issues include:
- Air bubbles
- Incomplete mixing
- Poor mold box setup
These aren’t failures. Each mistake highlights something to adjust next time.
Progress in mold making often comes quickly once you understand how silicone behaves. Small improvements in preparation, mixing, and pouring make a noticeable difference.
What matters most is consistency and patience. Over time, techniques become second nature, and results improve without extra effort.
Is Silicone Mold Making Right for You?
By now, you should have a clear picture of what’s involved. Silicone mold making suits people who enjoy hands-on work, problem-solving, and creating repeatable results from original pieces.
For beginners, repeatable, low-risk projects are a great way to build confidence. Simple items such as small decorative figures, Christmas tree ornaments, basic animal shapes for hand painting, or small plaques are ideal starting points. These projects allow you to focus on technique rather than complexity.
Many people find silicone mold making similar to cooking or baking. Once you understand the recipe, follow the ratios, and respect the timing, results become consistent. Guessing measurements or skipping steps usually leads to problems, while careful preparation leads to reliable results.
The start-up outlay is manageable, and projects can be scaled up gradually. Time, attention, and patience matter far more than expensive equipment.
If you’re looking for a practical skill that can be learned at home and applied across many creative or functional projects, silicone mold making is well worth exploring. You may also find our post on shell and mother molds would be very useful.
Taking the Next Step
If this guide has helped you understand what silicone mold making involves, the next step is simply choosing a small project and giving it a try. Every successful mold starts with a first attempt, and every improvement comes from hands-on experience.
If you’re unsure where to begin, need clarification on materials, or want guidance on choosing a suitable first project, you’re welcome to get in touch. Asking the right questions early can save time, materials, and frustration later on.
Silicone mold making rewards careful preparation and steady learning. Start small, stay curious, and build from there.
Written by Robby
Craft It All
From a mom’s perspective, a DIY silicone mold tutorial is a “double-edged sword.” On one hand, it’s a gateway to incredible rainy day activities, personalized birthday party favors, and handmade gifts. On the other hand, a mom looks at liquid silicone and thinks one thing: “How much of this is going to end up in my carpet?”
Reading through this guide, I’m already mentally scrolling through all the things I could replicate,from my kids’ favorite tiny plastic figurines to making custom “crayon molds” to recycle all those broken stubs at the bottom of the craft bin.
Thank you, Leah, for your perspective, thin plastic or dust sheets would help wth the carpet fears. And yes, the possibilities are endless,
Thank you for taking the time to comment.
Rob
This is an incredibly clear and reassuring guide for anyone curious about silicone mold making. I really appreciate how you break down the process into manageable steps, especially the detailed explanation of mold box types. That section alone clears up so much confusion beginners often have. Your emphasis on preparation, safety, and realistic expectations makes the whole process feel far less intimidating. I also like how you explain not just what to use, but why certain materials work better than others. The reminder that many failures start with a poorly built mold box is especially valuable advice. Overall, this post makes silicone mold making feel practical and achievable, even for someone working at home for the first time.